Sunday, May 29, 2011

Use of Date Module and Money Fields in tracking expenses

I decided to start working on a Drupal powered home expense tracker.  I created a content type called Bill by navigating to Administer, Content Management, and Content types.  Initially, this new content type would contain two fields:  an amount and a due date.  So I began to add an amount field but a type for money did not exist. 

Fortunately I found the Money CCK field module which allows for a field type of Money to be created for content.  This module also required the following modules:
After installing the Currency Exchange module, I navigated to Administer, Site configuration, and Currency API to modify settings for Currency API.  I changed Currency data update frequency setting to 1 day; One hour seemed to be a bit much for a site used by only me.  I left the other setting Log all currency exchange requests and errors to watchdog checked by default.

After installing the Money CCK field module and its required modules, I could add a field type of Money to the Bill content type.  The Money field type also lets you specify the following settings at creation:
  • Currency selection mode:
    • Choose the format of the label that will be displayed for options of the currency select list.
  •  Currency display mode:
    • Choose the format that will be used to display this money field when a node is rendered.
  • Decimals display mode:
    • Choose the method to select the number of decimals used to display the field. The standard precision for each currency is displayed in the Available currencies list.
  • You can also specify which currencies to allow.  I only selected United States Dollars, and I have not experimented with any more currencies.
Next I wanted to add a due date field with a type of Date, but the Date field type did not exist.  So I downloaded and installed the Date module. This module did not require any other modules, and I did not modify any settings.  The Date module enabled three different date types for a field:
  1. Date
  2. Datestamp
  3. Datetime
I chose type Date, and I did not use the other two types at all.  You can alter the following settings for a field of type of Date for a content type of Bill:
  • Default value: 
    • A default value to use for this field. If you select 'Relative', add details through the Customize Default Value sub form.
  • Input format: 
    • Set the order and format for the date parts in the input form. The format will be adapted to remove values not in the granularity for this field.
  • Custom input format: 
    • The custom format, if provided, will override the input format selected above. The custom format, if provided, will override the selected display or input options. Define a php date format string like 'm-d-Y H:i' (see http://php.net/date for more details).
  • Years back and forward: 
    • Number of years to go back and forward in the year selection list, default is -3:+3.
  • Time increment: 
    • Increment the minute and second fields by this amount.
You can also specify settings for the field named Due Date for ANY content type:
  • Whether the field is required
  • Number of values
  • To Date
    • Display a matching second date field as a 'To date'. If marked 'Optional' field will be presented but not required. If marked 'Required' the 'To date' will be required if the 'From date' is required or filled in.
  • Granularity:  
    • Set the date elements to be stored (at least a year is required).
  • Default Display
  • Time zone handling: 
    • Select the timezone handling method to be used for this date field.
After I added these two fields to the Bill content type, I added a few bills.  Success!  I can add bills, but how can I view bills?  That sounds like a question for another post.

Menu Breadcrumbs

After I set up the menu infrastructure that I wanted, I began to add content.  I noticed that Drupal displayed the breadcrumb trail correctly for items under the Navigation menu but not for my Primary links menus (Home, Games, etc.).


There's a module for this...the Menu Breadcrumb module.  You can download the Menu Breadcrumb module here.  After exploding the archive, log on to your Drupal site and enable the Menu Breadcrumb module here.


After installing the Menu Breadcrumb module, Drupal displayed the breadcrumb trail for my Primary links menu.  I did not have to do one more thing for this breadcrumb trail to appear. 


Menu Breadcrumb settings can be customized by navigating to Administer, Site Configuration, and then Menu breadcrumb.  These settings include:
  • Use menu the page belongs to for the breadcrumb.
  • Append page title to breadcrumb
  • Appended page title as an URL.
  • Hide the breadcrumb if the breadcrumb only contains the link to the front page.

The concept of modules has become a big selling point for me with Drupal.  I have worked with Asp.Net, but I have not tried to add a breadcrumb trail to a website.  However, I have a feeling that doing so would not be as easy as the two steps I just described.  I am looking forward to learning more about modules.

Thanks for reading.

Saturday, May 28, 2011

Menus in Drupal

I could not decide where to start on my local Drupal site.  While playing Street Fighter 2, I found a need for a quick way to reference the keypad combinations for the moves of each fighter.  Anything I found text files on the Internet, but navigating through these text files proved to be quite difficult.  So I decided to start with this quick reference for Street Fighter 2 moves.

I wanted a menu structure similar to the following:
-Games
--Street Fighter 2
---Fighters
----Ken
----Ryu
----etc...

I started by creating a page for each fighter, but none of my new pages showed up in a menu.  I could not understand what I had to change to make my fighters show up on a menu.  I eventually found that I had to create my menu infrastructure as Primary Links.  The fighters' pages already existed, but I need a page for the Games, Street Fighter 2, and Fighters menus. 

After I created the additional pages I needed, I could create the desired menu infrastructure.  I clicked on Administer, Site Building, Menus, and Primary links.  See the screen shot below for a visual path.

You can create the menu infrastructure by clicking on Add item.  On that page, enter the path for the page (node) to link to and the menu item title.  Next be sure to check the Enabled check box.  Finally, the correct parent item should be selected in the Parent item.  If I wanted to add a main menu item (i.e. Home or Games), the parent item would be <Primary links>.  I could then add Street Fighter II by adding a new menu item and selecting --Games as the Parent item.  Next I could add Fighters underneath Street Fighter II and then all of my fighters (Ryu, Ken, etc.)  

You can also specify the Parent item while editing the page.


I also wanted to be able to see my entire menu infrastructure on the left side of the browser.  This can be accomplished by setting up a Block.  Blocks can be accessed by clicking on Administer, Site building, and Blocks.  I dragged the Primary links menu up from the Disabled region to the Left sidebar region.  After clicking Save blocks, the menu showed up on the left side of the browser. 

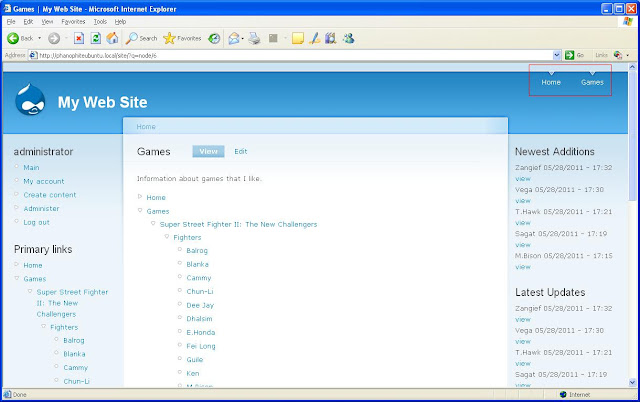
I noticed that Drupal displayed my menu infrastructure in the top right corner of my site.  

During my research of menus in Drupal, I stumbled across a way for sub-menus to be displayed and change with the currently selected menu.  If you navigate back to the Menus administration page (see the screen shot below), you can modify the settings by clicking on the Settings link.

If you change the setting for Source for the secondary links from Secondary links to Primary links, Drupal will display the appropriate sub-menu in the upper-right corner.  Keep in mind that the theme determines where these links will appear.  See below for the result after changing this setting.

That sums up my experience with menus.  I also worked a bit with the Submenu Tree module, but I will save that for another post.

Thanks for reading.

The Beginning

At my place of employment, we work with a content management system (CMS) called Drupal.  I do not personally work with it, but I find it interesting and I want to know more about it.  So I began developing a Drupal site at home.  I wrote a post for my Ubuntu blog about my experience installing LAMP.  So if you are looking for a tutorial for installing LAMP on Ubuntu 10.10, visit this post.

I created two blogs this weekend; I guess you could say I have been in a blog-building mood.  So far, writing these blogs provides a way for me to keep my writing skills up to par.  I have always enjoyed writing about things that interest me.  I have found writing these blogs to be fulfilling and satisfying.

So this will be my blog about Drual.  More information to come...